User Guide
Logging In
Access to your HS instance is done using your favorite browser, and navigating to:
https://yourdomain.com/admin
This entry point is usually protected by two-factor authentication.
Server Access
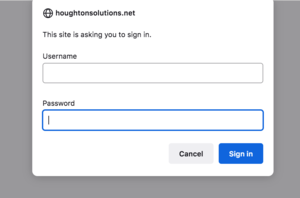
Your browser may prompt you with a pop-up box asking for server credentials (username and password).
This is the first level of security to your database. Normally, the same credentials are used here by all of the HS users in your organization. Check with your HS administrator to gain this information. If you are on a trusted computer, have the browser save this information for you so you won't have to enter it again in the future.
Your Personal HS Login
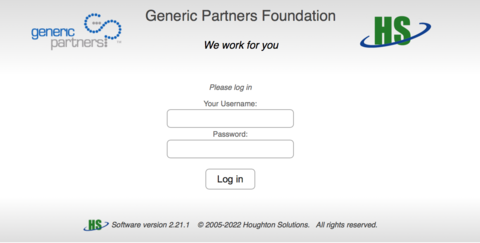
Next you'll see the main HS login screen, which should look something like this:
Enter your personal credentials here to login to HS. If you don't have a personal login, see your HS administrator.
Tip: for future quick access to HS, bookmark your home screen in your browser after logging in, not the login screen. This will save you time if you're already logged in.
If your credentials are rejected, you'll see a Forgot Password link to reset your password if necessary, based on your valid email address.
HS Overview
Your HS System is comprised of database tables, software tools, and reports and graphs for analytics. Access your data by navigating to your desired place of interest or work function, using the menu system and/or the navigation bar.
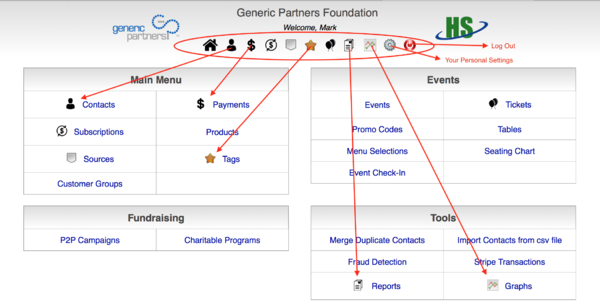
Use the navigation bar to jump quickly to a commonly used screen:
If you're not sure about the meaning of any icon, move your cursor over it and a description will be displayed.
Or, navigate your menus by clicking on the desired option.
Tables: Accessing Your Data Directly
All of your information in HS is stored in database tables on your production web server. For example, the Contacts table is the heart of your database and contains a record for every person or organization that you have a business relationship with, whether they are customers or donors, active followers, cultivation targets, or marketing leads.
Other examples of tables in HS include Donations/Payments, Source Codes, Contact Tags, Products, and Subscriptions.
Your data is accessed directly through two types of screens: Summary Screens and Detail Screens, both of which are designed to have the same, easy-to-use, intuitive user experience.
Summary Screens
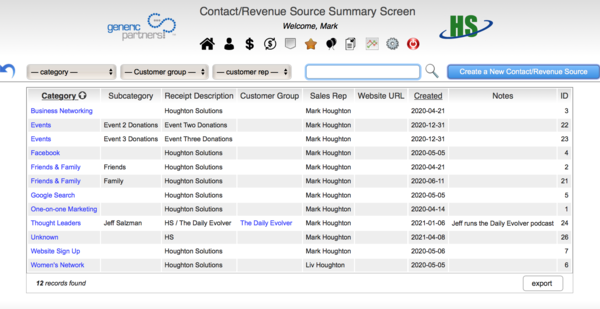
When navigating to an HS table without specifying a specific record, a Summary Screen will be displayed.
This screen is designed to help you find the record or records you are looking for, and is not a report, although it may appear like one.
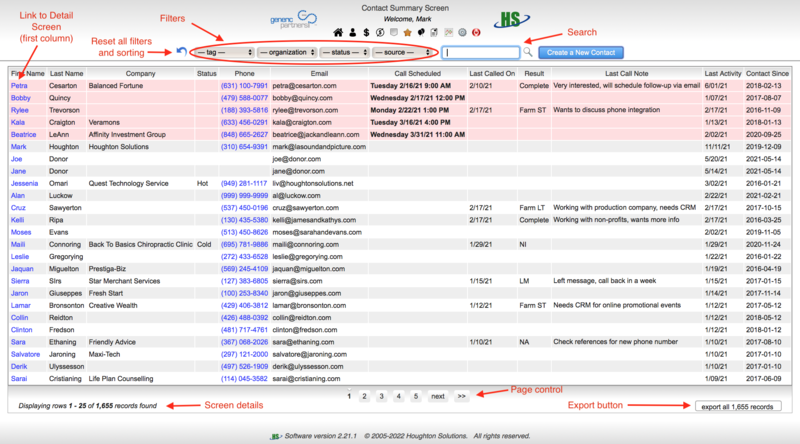
It has a set of common functions available to you to help you in your search.
Filters
These pulldown menus will limit the Summary Screen to display only those records which have the value of the filter selected. If multiple filters are used, the records must match all of the filter values chosen. Use the reset button to clear all filters when desired.
Search Box
This is a search-as-you-type box, that will search the table you are viewing by any number of fields. As matches are found, they will be displayed automatically, allowing you to use your down-arrow key or mouse to select the record you're looking for.
The first matching record found is always highlighted by default.
Note: Don't hit the return key until the record you are looking for is highlighted. If no list is shown, that means no records have been found that match your search input.
Note: For very large tables, there might be a slight delay before matching records are displayed, but you shouldn't have to wait more than a second or two in any case.
Paging
Use the Page control buttons to navigate to specific pages of your Summary.
Note: The number of records displayed on each page may be changed in your Personal Settings.
Sorting
You may click on any column heading to sort the records shown by that column, by ascending value. Clicking a second time will sort by descending value. Clicking a third time will remove the sort and revert to the default sorting for that table. Use the reset button to reset all filters and sorting to their default values.
Exporting
If you have proper access privileges, the export button allows you to download the entire Summary of all records to a csv file on your computer. Filters and sorting apply, and only the columns shown on your screen will be included in the export.
Detail Screens
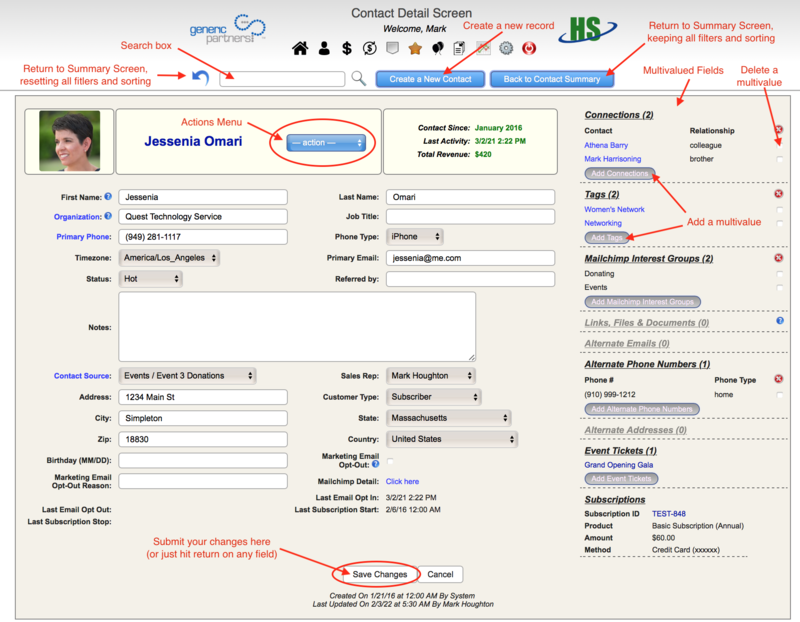
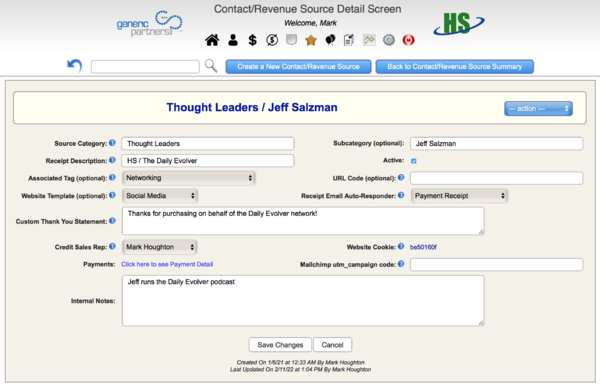
Once you've selected a specific record, either by clicking through on the first column value of your Summary Screen, or by using the Search Box, you will bring up the Detail Screen for that record in the table.
The Detail Screen allows you to view and/or edit a specific record in the table.
You must submit your changes before they are stored in the database, either by hitting a return on any text field, or by clicking the Save Changes button.
You can see when and who created and last updated every record in HS just under the Save Changes button.
Note: The Search Box remains active at the top of your Detail Screen, so you don't need to go back to the Summary Screen to find a different record by that method.
Field Help Text
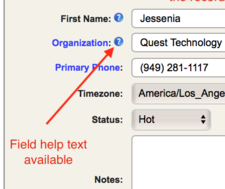
If you see a blue question mark next to a field label, there is help text available. View it by hovering over or clicking on the blue question mark.
Refresh Data
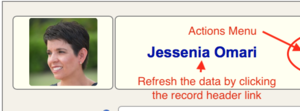
If you need to refresh your Detail Screen for any reason, simply click on the record heading link.
Note: Clicking here will abandon any changes made that have not already been saved.
The Actions Menu
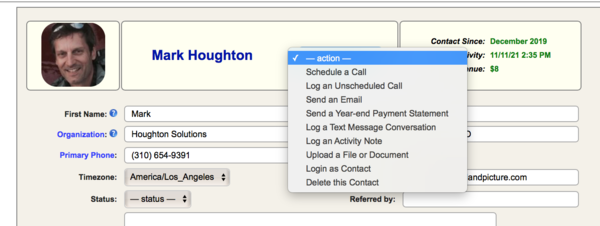
For most tables, an actions pulldown menu is available to the right of the record header, allowing you to perform functions specific to that table on that record.
Multi-valued Fields
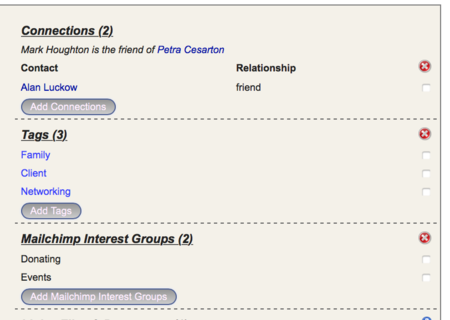
Data fields that may have multiple values are shown on the right-hand portion of the Detail Screen, if there are any. In this section you can add new values, or delete existing ones for that record.
Changing these values is done by deleting the value, and then adding the correct value afterward.
To delete a value, check the delete box to the right and click Save Changes.
Formatted Text Fields
Certain tables in HS allow for HTML-formatted text in specific fields. These fields are displayed in What-you-see-is-what-you-get (WYSIWYG) fashion, and contain a formatting toolbar displayed above the text.
These fields may contain formatted text, images, and hyperlinks within them. Enter your copy, select it, and format it using the toolbar icons desired.
Note: This tool is a rudimentary one to allow simple HTML formatting to be shown in emails and web pages. For more complex formatted copy, we suggest using an HTML editor and pasting the HTML directly into the field using the 'Show Source' tool (the last icon in the toolbar).
For help inserting hyperlinks and images, see the How-To Guide
Contacts
Your Contacts are the heart of your database. Everyone connected to your organization should have a record here.
Use the Summary Screen filters to quickly narrow down your Contacts by a variety of fields.
To find a specific Contact, use the Search Box to search on any part of their name, email address, phone number, city, or referred by fields.
The Detail Screen is designed to show virtually everything you know about each Contact, without having to open additional tabs or windows. Simply scroll down to see all of the Contact's activity stored in your database.
Customer/Donor Types
This is your main Customer/Donor grouping. You can set the values that make sense for your organization using the Company Parameters->Customer/Donor Types from your HS homepage. Typically these groups include values like 'Member', 'Subscriber', 'Premium Subscriber' and the like.
Contacts may have one and only one Type at a time. For types where multiple values may apply, consider using Tags instead.
Connections: Relationships between Contacts
This section allows you to show the relationships between Contacts. When making a new entry here, the connected Contact must already exist in your database. Use the search function within the Contact box to find the existing Contact, select him/her, then enter the type of relationship.
Connections are displayed on the Detail Screen for both Contacts in the relationship.
Grouping Contacts: Tags
Contact Tags allow you to group Contacts any way you see fit. Tag values are managed from the Tags table, accessible from either the HS Home screen or the Navigation Bar. A Contact may have as many Tags as necessary.
Tags may be automatically applied to Contacts when they are created or imported for a given Source, if the Source has an associated Tag.
Tags may also be synced automatically with Mailchimp Tags for further flexibility. See more on this in the section on the Tags table.
Contact Links, Files, and Documents
This section allows you to store hyperlinks that relate to this Contact (Facebook page, LinkedIn page, etc).
It also shows any documents, images, pdf's, or other files that you have uploaded to this Contact via the --actions-- pulldown menu option "Upload a File or Document".
Alternate Emails, Phone Numbers, and Addresses
Use these sections to store additional email addresses, phone numbers, and addresses for this Contact.
Event Tickets
If you are using the HS Event Tickets module, use this section to see all tickets to all of your Events that this Contact has had, or to manually give tickets to an Event. Click through on the Event shown to see more information on any ticket.
Customer/Donor Subscriptions
This section shows all active and past paid Subscriptions for this Contact. You may click through on the Subscription ID for more information.
Additional Contact Information: Payments/Donations, Comments, Orders, and Activity History
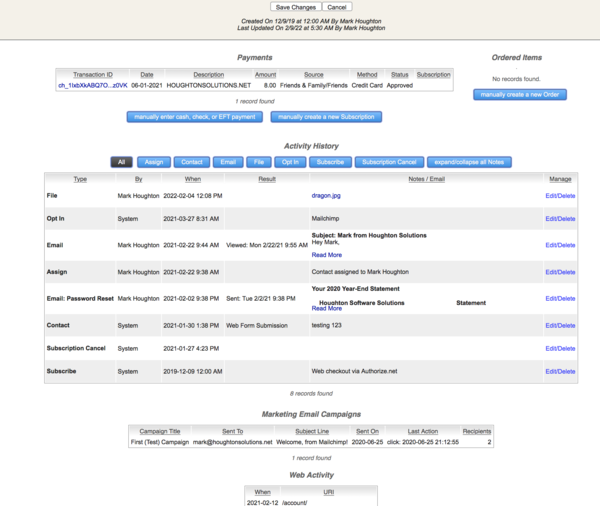
These windows show all the other related information for this Contact, including all payment transactions, orders, marketing emails, website activity, and email auto-responders sent out from your system to this Contact.
You may also manually enter Donation/Payments, Subscriptions, and/or Orders for this Contact using the corresponding action buttons in this section.
The Activity History section has additional filters to help you view the variety of Activity Types that have occurred for each Contact.
How To Import Contacts
Please see the How-To Guide
Sources (a.k.a. "Source Codes")
Sources are used for identifying both Contacts and Payments/Donations with their origin. It's important to set this table up with all possible sales and marketing campaigns or funnels where you want visibility on their performance.
Sources are stored as cookies on your website while people browse your site, and typically have a lifetime of one year. Whatever the latest sales funnel someone uses to arrive at your site will be stored in the cookie.
By adding a special code to the end of the links to your site from different places (e.g. email marketing, external ad placements, etc), or by defining specific landing pages, the Source cookie will be set on the user's browser.
This way, once a person chooses to engage with your organization by signing up, creating an account, sending you a message from your contact us page, or purchasing/donating, HS will assign that Source to the Contact when they are first created in your database, and on the Payment/Donation record each time they make a purchase or donate.
Categories & Subcategories
Taken together, a Category and optional Subcategory uniquely define a Source. This two-tiered heirarchy allows you to gain insight into how effective each sales campaign or funnel is.
Associated Tag
This optional field allows the Contact to be assigned a specific Tag whenever they engage through this Source. This can be helpful when Contacts already exist but they re-engage through a different funnel, since the original Contact Source will never be changed by the system (you can change it manually if desired). See the Contact Tags section for more details.
Methods of assigning Source Codes to Contacts and Payments/Donations
There are three ways to set the Source cookie on your website: a specific landing page (URL Code), a special code at the end of a hyperlink to your site (Website Cookie), or defining the email marketing utm_campaign code used to click through to your site from a marketing email.
URL Code
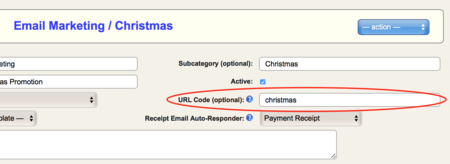
If you have a specific page on your site that you wish to use to set the Source cookie, enter it here (without your domain). For example, if you wish anyone landing on the page https://yourdomain.com/christmas to be tied to this Source, enter "christmas" in this field.
Website Cookie
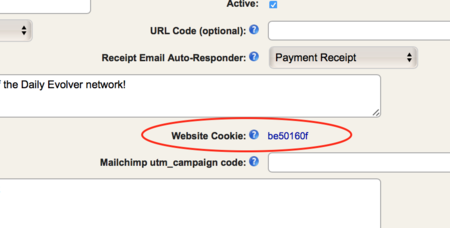
If you don't have a specific landing page for a source, but you are using a link to your site from other places (emails, ads, or anywhere there is a link to your site from outside of it), you can append the link with the 'Website Cookie' value for this source.
In this example, the code is "be50160f" (automatically generated), so you could promote the link https://yourdomain.com/?lsc=be50160f to set the Source cookie.
Once the cookie is set, your customer or donor can navigate throughout your site at will, and when they choose to purchase, donate, or engage through your website, HS will know and record their last known Source for your analytical needs.
Cookies can last for up to a year on a users browser, which will always hold the Source from the last coded link (as shown above) for accurate tracking of your sales funnels.
Email Marketing UTM Campaign Code
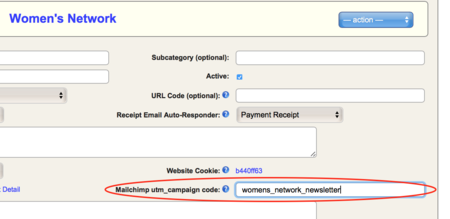
This is more of a fallback feature, in case you have marketing email links with the "utm_campaign" parameter set in the link coming from a particular email marketing campaign.
If you use this field, anyone navigating to your site with the utm_campaign parameter in the link set to this value, their website cookie will be set to this Source.
Payments/Donations
Payments (for-profit) or Donations (nonprofits) table holds every individual monetary transaction for each customer or donor, regardless of payment method (credit card, PayPal, cash, check, etc).
Each transaction may be associated with a Subscription or Order, and has it's own Source Code which is automatically set based how the transaction took place, and may be manually changed when needed.
Note: For transactions made through external gateways (credit cards, PayPal, etc), you may not delete the transaction or change the date or amount, but you can modify the description, Source or Sales Rep.
Transactions from external gateways
If your HS instance is integrated with payment processors such as Authorize.net, Stripe, and/or PayPal, transactions from these gateways will show up automatically in real-time as they are posted.
For more information on setting up integrations, see the HS Administrator's Guide
How to manually enter a transaction
Please see the How-To Guide
Subscriptions
The Subscriptions table holds recurring payment subscriptions for each customer or donor. They are usually linked to your payment gateways, and contain the status, amount, and frequency of each subscription.
Subscriptions are automatically created at checkout on your website when a recurring purchase or donation is made.
Normally this table is maintained automatically by your payment gateway (Authorize.net, Stripe, PayPal, etc), but you may also create manually maintained subscriptions that are paid by check or other means.
Except for manually entered Subscriptions, most fields on this table are not user editable, since they are controlled by the payment gateway.
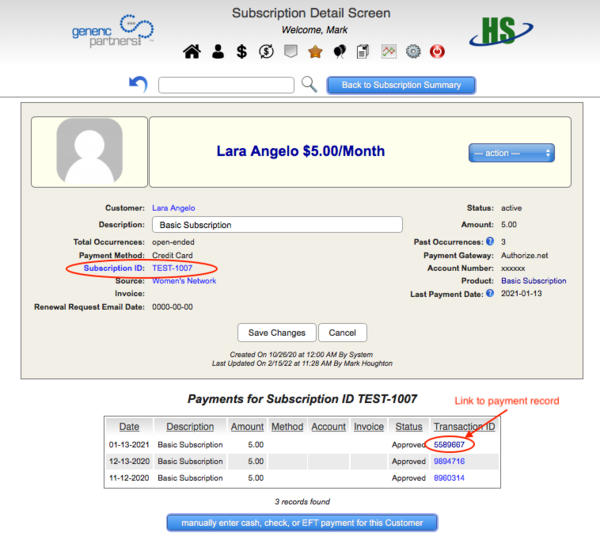
In order to properly track recurring payments, it's important to make sure recurring payments or donations are properly linked to their subscription record. This is done via the Subscription ID field.
The Subscription ID
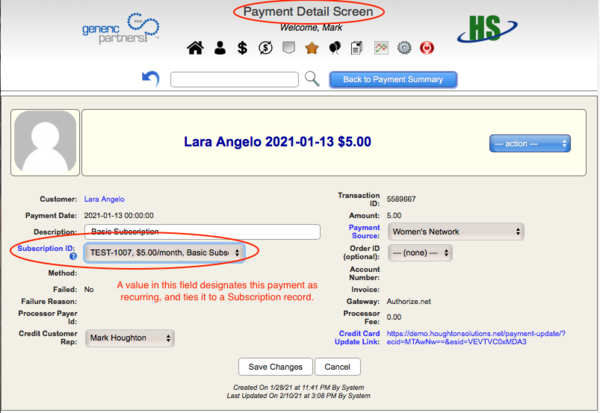
This important field is a unique identifier of each subscription, and is normally provided by the payment gateway. When attached to a payment or donation, it designates the payment or donation as recurring, and the Contact as a recurring Customer/Donor.
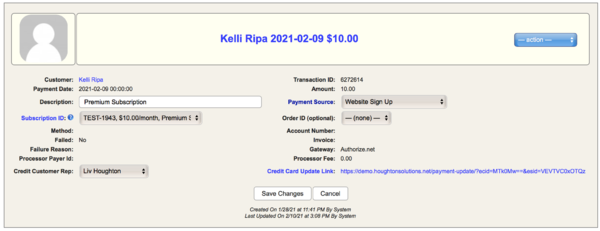
In this example, here is the latest Payment record associated with this Subscription:
Important Note: For manually created and maintained Subscriptions, you must create your own unique Subscription ID for each Subscription. We suggest you come up with a naming scheme that works for you.
Cancelling Subscriptions
Please see the How-To Guide
Email Auto-Responders
Sending automated emails to your Contacts is an important HS feature, and are used in a variety of contexts.
The most basic use case is the Thank You/Receipt email auto-responder, sent automatically when a purchase or donation is made.
Another HS feature is to send auto-responders when recurring payments fail, usually because of a credit card issue. These auto-responders will direct your customer or donor to a page on your website where they can correct their payment issue on their own, saving you time and resources.
They include merge fields that will be populated with information specific to the event before sending, such as the Contact's name. An example merge field could be [[FIRST_NAME]]. When defined in your auto-responder, it will be replaced with that Contact's first name.
Auto-responders tend to be highly customized for each business or nonprofit. Your HS consultant will assist you in setting these up with your initial HS installation.
Fraud Detection
The fraud detection and prevention feature in HS is meant to prevent bots and other scammers from polluting your database and/or attempting to run multiple fraudulent credit card transactions.
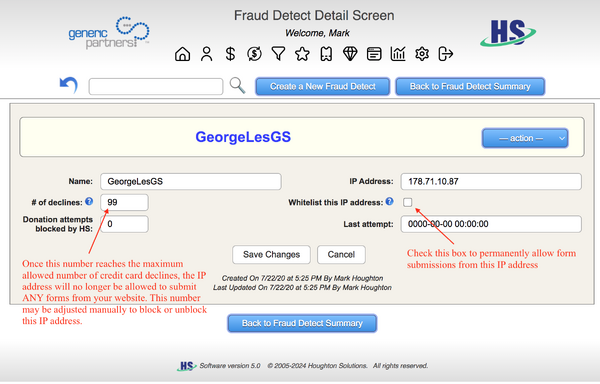
When an end-user attempts a credit card transaction from your donation/checkout page and it is declined, the system stores the number of declined attempts for the incoming IP address in the Fraud Detection table. When a certain number of declined transactions have been made from the same IP address within 6 months, that IP address is blacklisted and HS will no longer accept ANY form submissions from that IP address, showing an error message to the end-user that no more form submissions will be allowed. (The default number of declined transactions is 5, and may be changed in your Company Settings).
The Fraud Detection table can be maintained directly from your HS Tools menu. From the Fraud Detection detail screen, an IP address may be whitelisted, blocked or unblocked manually.
Reports
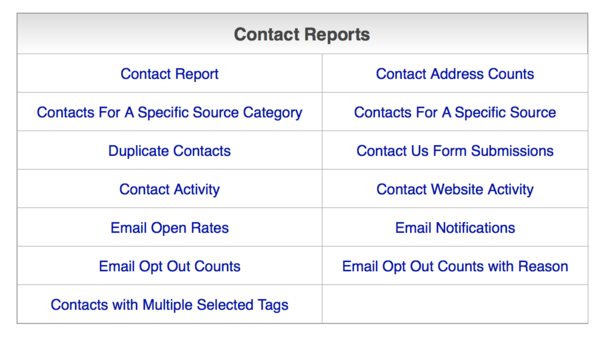
Reports are found on the reports menu and its submenus.
HS comes with a set of standard reports. Custom reports for your organization are also found here.
Although each report is different, they follow the same basic format.
Report filters
Most reports have a set of filters to control the output of the report. Enter the proper values before submitting your report.
By default, reports are displayed on the screen. However you always have the option to download the report as a csv file by checking the 'Download Report' checkbox before submitting. This is particularly useful when more advanced analysis is needed, for example making pivot tables with Excel.
There is also an option to display the report without the standard HS headings and footing, to make it suitable for printing. Use the 'Printable Format' checkbox for this option.
Once your report is displayed, you may re-sort the output by any column value by clicking the column heading field. Clicking a second time will reverse the order, and clicking a third time will revert to the default sort for the report.
Tip: If you have a report that you run often with the same parameters, you may bookmark the report output URL to quickly re-run that report in the future. If there are date values that include today's date, the date will remain fixed as part of the URL so you may need to change it to a date far in the future to avoid missing new report data when you use your bookmark.
If you would like to see a report of information that is not available, ask your HS administrator or contact HS directly to see about creating new, custom reports that meet your needs.
Graphs
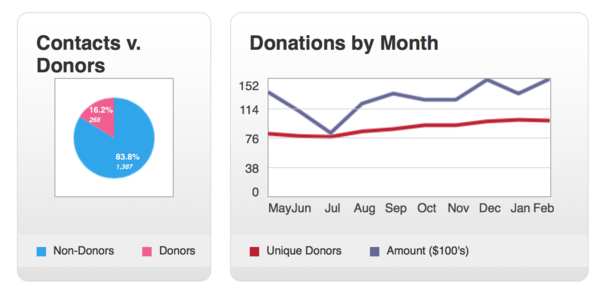
HS comes with a set of standard graphs to help you analyze trends in your business. Navigate to the Graphs menu to see those graphs that are available to you. Custom graphs for your organization are also found here.
If you would like to see a graph of information that is not available, ask your HS administrator or contact HS directly to see about creating new, custom graphs that meet your needs.
