FAQ
Contacts
How to upload a file to a specific Contact
On the Contact Detail Screen, use the --actions-- pulldown menu option "Upload a file or Document"
How To Import Contacts
You can import Contacts into HS from either csv files or vCards.
Both options are available from the Tools menu on your Home Screen. Navigating to these screens will give you detailed instructions on specific steps.
When importing, choose the Source code to assign to new Contacts. If Contacts already exist, their record will be updated with any new information, but the Source will not change since it represents how they first engaged with your organization.
Contact Tags
How to automatically Tag Contacts based on their Source Code
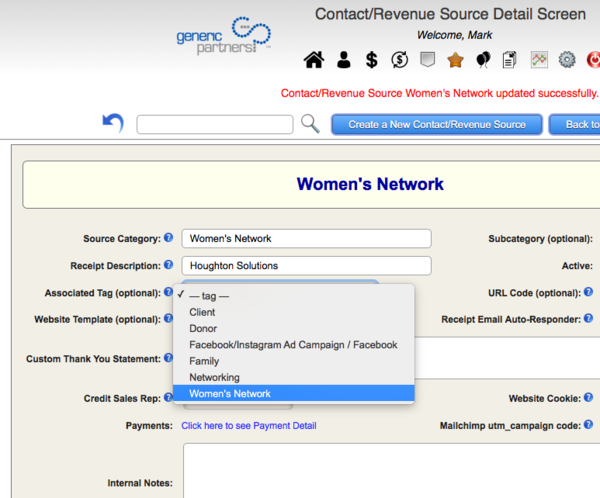
Each Source record has an optional field to automatically Tag Contacts who engage with you via your website through a specific sales funnel (Source). This will occur regardless of whether the Contact already exists in your system, even though their Source on the Contact Detail Screen is only set once, when they are first created in your database.
When a Contact engages with you through your website (subscribes, donates, makes a purchase, etc), and the Source cookie is set, they will automatically be tagged as defined by that Source.
Note: Setting the Associated Tag field will not retroactively tag Contacts from this Source, but will do so going forward.
How to Tag a set of existing Contacts all at once
When setting up your Tags, you may wish to tag a large set of your Contacts without having to do it manually, one-at-a-time. You can use the Contact Import Tool combined with a Source record associated Tag as described above, by taking the following steps:
- Create a csv file of only the desired Contacts using a report or the Contact Summary Screen, with at minimum their basic information: First name, last name, and email address.
- Create or modify a Source record to have the desired associated Tag
- Import the Contacts using the Import Tool, and choose this Source value before submitting.
When you submit this import, all of the Contacts in your csv file will get tagged accordingly. The Contact Import Tool avoids duplicates, so you won't have to worry about that. And if any new Contacts are created, they will be assigned the chosen Source value for their Contact record.
How to sync HS Contact Tags with Mailchimp Tags
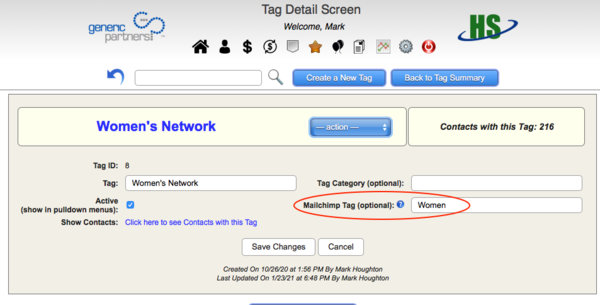
The Tag Detail Screen has a field that lets you specify a Mailchimp Tag value. This can be useful in defining segments in Mailchimp for email marketing campaigns.
Navigate to the Tag Detail Screen for the Tag desired, and enter a Mailchimp Tag value in the field.
Note: Entering a value here will only sync with Mailchimp going forward, i.e. it will not tag the Mailchimp records for HS Contacts previously tagged with this HS Tag. To mass-populate Tags in Mailchimp, you'll need to import them into Mailchimp from a csv file that you create, and set the Mailchimp Tag during that import.
Payments/Donations/Subscriptions
How to manually enter a Payment/Donation or Subscription
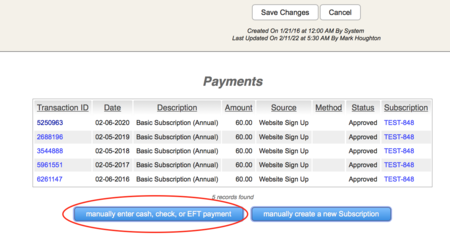
Cash, check and other transactions may be manually entered from the Contact Detail Screen, using the blue buttons in the Contact's Payment/Donation history section.
You may also create a Subscription record for the Contact, but only do so when the Subscription is not controlled by an external payment system that is integrated with HS (Authorize.net, Stripe, PayPal, etc).
Note: Manually entered payments may be modified or deleted whenever necessary.
How to edit or delete a Payment/Donation
For manually entered payments/donations, HS allows you to edit most fields on the transaction, or delete it entirely using the —action— pulldown menu.
However, if a transaction was created by an external payment gateway, editing or deleting the transaction (except for the description field) is not allowed. This is a safety feature to insure data integrity between the two systems.
If for some reason you still need to edit or delete one of these transactions, you may override the safety feature by taking the following steps:
1) On you Company Parameters menu, open the Payment Methods (for-profit) or Donation Methods (nonprofit) table.
2) Click through on the Method used in the transaction you wish to edit or delete, which will bring up the Detail Screen for that Method.
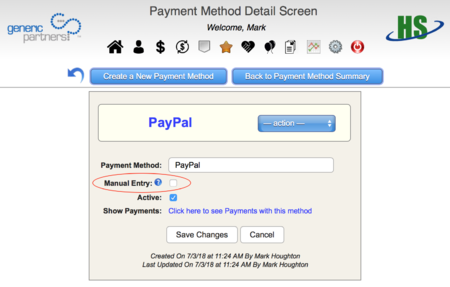
3) Temporarily switch the "Manual Entry" checkbox on, and save your changes.
4) Bring up the Payment/Donation Detail Screen for the transaction you wish to edit or delete, and perform the necessary actions to correct or delete the entry.
5) Finally, go back to the Payment/Donation Method and uncheck the "Manual Entry" field, to re-enable the safety feature.
How to cancel a Subscription (recurring payment or donation)
The method for cancelling a Subscription depends on which payment gateway controls the recurring payments.
Cancelling an Authorize.net ARB
Subscriptions in Authorize.net are called "Automated Recurring Billing" (ARB), and should be canceled from HS, not from your Authorize.net system. The reason for this is because Authorize.net does not post the cancelation event to HS, so if you cancel it there, your HS database will not be notified.
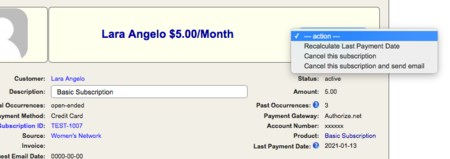
Navigate to the Subscription Detail Screen to cancel, either from the Contact Detail Screen or from the Subscription Table directly, then choose your desired action from the —action— pulldown menu, depending on whether or not you'd like to send a cancellation email auto-responder.
Note: These options are only available for active Subscriptions.
This will cancel the subscription at Authorize.net, and change the status of the Subscription to canceled.
Cancelling a Stripe Subscription
To cancel a recurring payment or donation controlled by Stripe, login to your Stripe dashboard, find the Subscription, and cancel it there. Stripe will then notify HS of the event, and HS will automatically update the Subscription record and send the cancellation email auto-responder if you have it set up.
Cancelling a PayPal Subscription
To cancel a recurring payment or donation controlled by PayPal, login to your PayPal dashboard, find the Subscription, and cancel it there. PayPal will then notify HS of the event, and HS will automatically update the Subscription record and send the cancellation email auto-responder if you have it set up.
Cancelling a manually created Subscription
Navigate to the Subscription Detail Screen to cancel, either from the Contact Detail Screen or from the Subscription Table directly, then choose your desired action from the —actions— pulldown menu, depending on whether or not you'd like to send a cancellation email auto-responder.
Note: These options are only available for active Subscriptions.
Sending Emails
How to send a one-off email to a Contact from HS
Find the desired Contact in your Contact Detail Screen.
If you want to attach a file to your email, first upload the file to the Contact record using the action pulldown menu option "Upload a File or Document". Any files uploaded to a Contact will be optionally available to attach to emails sent to this Contact.
Then, from the actions pulldown menu, choose "Send an Email".
The email body and signature will be pre-filled with your personal template, which is maintained from your account settings (the Gear option in the navigation bar).
To attach an uploaded file or files, you may highlight as many as you like from the selection window before sending the email.
How to Batch Send an Email Template to a specific group of Contacts
HS allows you to send a Production Email template to up to 500 specific Tagged Contacts as a batch process.
In your Email Auto-Responders module, find the desired Production Email Detail Screen, and use the action pulldown menu to choose "Batch Send to Specific Tagged Contacts". A pop-up will appear to select the desired Tag, then submitting will start a User Batch Job that will email that Template to all Contacts with the chosen Tag.
HS Production Emails contain a field called "Delivery Code File". This code file is used to match up your [[MERGE_FIELDS]] with their corresponding data for each contact. If data fields outside of the Contact record need to be substituted for merge fields, speak to your HS systems consultant to program this customization.
However if the only merge fields necessary are Contact data fields, you may use the generic Delivery Code File "mail_contacts.php" which will automatically merge all merge fields corresponding to columns in the Contacts database table, plus [[CUSTOMER_TYPE]]. Examples include [[FIRST_NAME]], [[EMAIL]], [[ZIP]], [[CUSTOMER_TYPE]], etc. Speak with your HS systems consultant for more information.
To attach a file or document to each email, first upload the file to the Production Email Detail Screen using the actions pulldown menu option "Upload a File or Document." Note that this file will be attached WHENEVER THIS EMAIL IS SENT.
How to view Production Email delivery information
To see a detailed list of the status of each email sent, go to Reports->Contact Reports->Email Notifications
Then choose the Production Email you wish to review and the date range, and Submit.
How to detect HS emails that failed to send
Go to Reports->Contact Reports->Contact Activity Report
Then choose the following filters: Activity type "Email", and Result "Error - failed to send"
Formatted Text
How to insert a hyperlink in a formatted text field
To include a hyperlink, select the link text or image and click the Insert Hyperlink icon. Enter the URL and hit submit.
How to insert an image in a formatted text field
To include an image, the image itself must first be uploaded to your server (or anywhere else on the internet) so there is a unique URL for the image. The image should be sized properly for web or email display.
Note: If you're not sure where to upload your image, once choice is to use your own personal Contact Detail record, and upload the image there using the actions pulldown menu. Once uploaded, you can obtain the image URL from the multivalued list of Links, Files, and Documents section on the right-hand side of the screen.
Once you have a unique URL for your image, place the cursor where you want the image to appear and click the Insert Image icon.
