Administrators Guide
This document is intended for users with full administrative access to HS.
Remember, if you'd like your HS system to be customized beyond your initial setup, we're here for you. Contact us directly at info@houghtonsolutions.net to discuss your needs.
Company Settings
Many aspects of your HS Instance are controlled from your Company Settings master record. It's important to understand these fields and set them up properly so your HS CRM works correctly for your organization.
Your HS consultant will help you understand and define these fields during your initial setup. Also be sure to use the blue question mark help messages for more information about each field.
Sending email from HS
Emails sent from HS, including auto-responders as well as one-off emails from the Contact Detail Screen, use the following fields in the Company Settings to send SMTP email:
- Email Server
- Email Server Port
- Email Authentication Username
- Email Authentication Password
- Email Secure Protocol (ssl/tls)
Debugging email send issues
There is additional field, Email Debug Level, that will print all SMTP connection information available whenever an email is sent. This is helpful when emails are not sending properly. Set the desired debug level, then go to the Contact Detail Screen and attempt to send an email to yourself from your own Contact record, using the — action — pulldown menu option.
When the email is sent, all debug information will be displayed on your screen to help you and/or your email systems administrator in solving the problem that is keeping your emails from being sent.
Be sure to set this debug level to DEBUG_OFF when you are finished debugging.
HS Menus
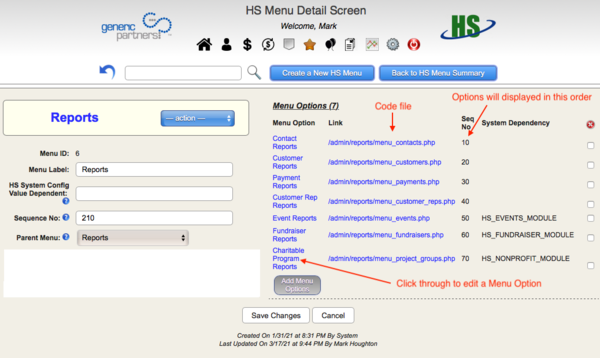
You can maintain your menus and menu options to each as you see fit with HS.
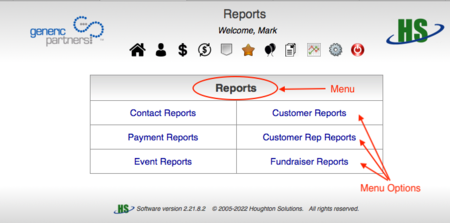
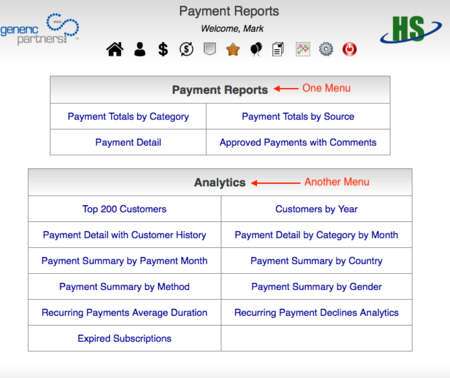 (An HS landing page with two menus)
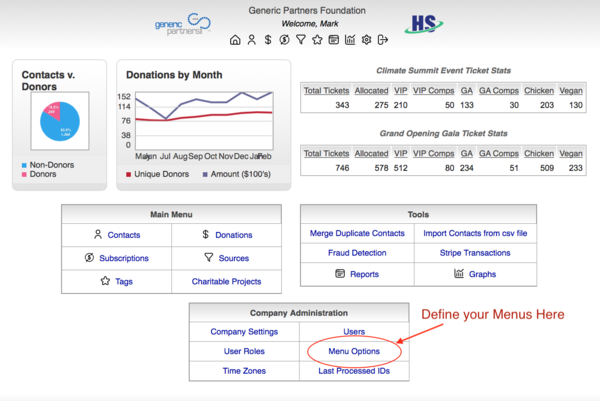
You can create new menus, or modify existing menu options from the Menu Options section in your Company Administration menu on your HS home page.
HS User Administration
Users in HS are those staff members that have access to your HS back-end system, are unrelated to the Contacts table.
Administrators (Users with Full System Access) may create or edit any User. Users without this privilege may view other User records, but may only change their own.
Choose the Users option in the Company Administration menu to add, change, and delete User records.
Revoking HS Access
Once a User has been active in your system, you probably don't want to delete their record so you can maintain a history of their activity.
To revoke access to HS, simply uncheck the "Active" checkbox in their HS User record, and their login will be disabled.
User Roles
User Roles allow you to define permissions for your staff to access various menu options in your HS system, and keep other screens off-limits to certain Users.
For each set of access permissions that you want, create a separate User Role. Then assign Users to the User Role they belong to using the User Detail Screen.
Access Types
HS has two types of permissions: Grant and Deny.
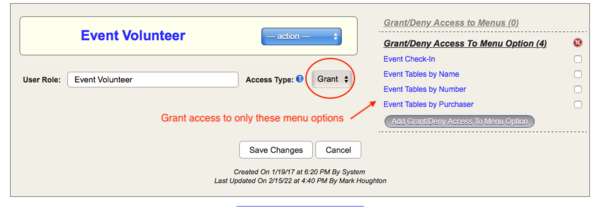
With Grant access, you specify exactly which Menus and/or Menu Options the User has access to.
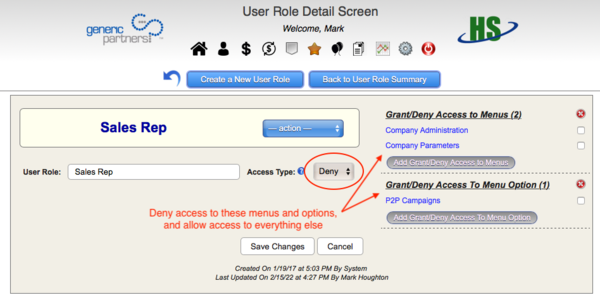
With Deny access, you specify which Menus and/or Menu Options the User does not have access to.
In this example, Users with the Sales Rep role have access to everything except the Company Administration menu, the Company Parameters menu, and the P2P Campaigns menu option:
Whereas in this example, Users with the Event Volunteer role has access to only the Menu Options shown, and no others:
User Batch Jobs
The Batch Job system in HS allows users to queue a potentially long-running process for execution, and be notified of their success or failure afterward by email.
The components of the system are as follows:
- The user_batch_jobs table, which controls each job and contains the execution information including job output;
- The /admin screen to enter job parameters, upload csv files if any, and schedule the job for execution;
- The cronjob /src/exec_user_batch_jobs.php, which polls the user_batch_jobs table each minute to kickoff any new batch job requests;
- The main batch job source program, located in the /src directory and accepting a set of parameters;
Example Batch Job: Import Missing PayPal Transactions
PayPal is not completely reliable with their transaction-posting webhook (Instant Payment Notifications/IPN), so HS has a tool to periodically import any missing transactions within a date range.
The request screen is found at Home->Tools->Import Missing PayPal Transactions, or /admin/paypal_batch_import.php:
Once the user generates and exports the csv file from their PayPal account, uploads it here, and submits the job, the following takes place:
- The /admin screen process will insert the job request record into the user_batch_jobs table using the following code:
$src="batch_paypal_import.php";

include "batch_job_schedule.php";
- The cronjob exec_user_batch_jobs.php will find the unprocessed job record and start the batch program in the background using the PHP exec command:
$cmd = "nohup $PHP $src --id=$id >> ".LOG_DIR."/user_batch_jobs.log 2>&1 &";

UPDATE user_batch_jobs SET date_started=NOW() WHERE id='$id'

exec($cmd);
- The batch program itself, in this example /src/batch_paypal_import.php, will then execute the job and log the output with the following code:
$log_filename = "paypal_import.log";

require "batch_job_start.php";   // opens this job's logfile, reads all input parameters from user_batch_jobs record

(code to import any PayPal transactions in the csv uploaded file that are missing from the HS payments table)

require "batch_job_finish.php";  // updates the user_batch_jobs record with success/error message, date_completed, and notifies the requesting user via email
3rd-Party Integrations
Integration with 3rd-party systems allows you to partner with credit card and payment processors, large-scale email marketing, e-commerce shopping carts, and just about any other system you may be using to engage with your customers or donors. If your 3rd-party system isn't included here, contact us directly and we can make it happen!
Communication with these systems is normally done using REST API's, where your HS system is waiting for notifications, often called webhooks, of transactions made on other systems. HS will then automatically update your database with the information so your system is always up-to-date.
Google Analytics & Recaptcha
Use this section to integrate your HS-enabled website with Google's Analytics and Recaptcha products. See your HS Consultant for more information if necessary.
Authorize.net
Authorize.net is a leading online credit card processor, that has a proven track-record of security and reliability.
They also offer direct EFT bank transfers, and can manage automatic subscription payments from your customers or donors by bank or credit card. At Authorize.net this system is referred to as Automated Recurring Billing (ARB).
Configuring Authorize.net for HS
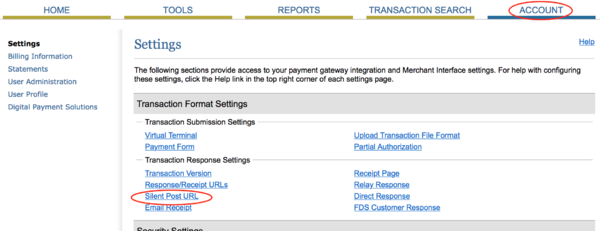
Once your Authorize.net account is set up, you'll need to set your Silent Post URL and create an API key in order for HS to validate and accept credit cards from your website in real-time.
Login to your Authorize.net account, then navigate to your Account page and click the Silent Post URL link:
Then, for the Silent Post URL, enter https://yourdomain.com/src/authorize_transaction.php
Next, on Authorize.net navigate to your Account page and click the API Credentials and Keys link.
Create a new transaction key, and store the both the API Login ID and your secret transaction key in your HS Company Settings Authorize.net section:
Authorize.net will then post all transactions to HS in real-time, keeping your Payment/Donation database up-to-date at all times.
Stripe
To integrate your HS instance with Stripe for online credit card transactions and recurring payments, you'll need to:
- Create an API key pair to link your website to Stripe for checkout
- Setup a Stripe Webhook to post events to HS
Note: Stripe offers a "Test Mode" instance, completely separate from your production instance, which can be very useful during development. It has its own set of API keys, Webhooks, Products, and Pricing, so be sure to be in the correct mode for your task at hand.
Stripe API Keys
Login to your Stripe dashboard then click on "Developers" and then "API keys":
Generate an API key pair, and store this information in your HS Company Settings in the Stripe section:
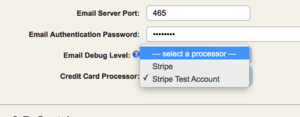
Also in your HS Company Settings, choose your between production and test mode:
Note: If your HS instance is not configured for Stripe, you won't see these fields. Contact your HS consultant to initialize this for you if needed.
Stripe Webhook
Login to your Stripe dashboard then click on "Developers" and finally "Webhooks":
You'll need to create a webhook to post to https://yourdomain.com/src/stripe_transaction.php and be sure to include at a minimum the following events:
- charge.failed
- charge.refunded
- charge.succeeded
- checkout.session.completed
- customer.subscription.created
- customer.subscription.deleted
- customer.subscription.updated
Setting up Subscriptions in Stripe
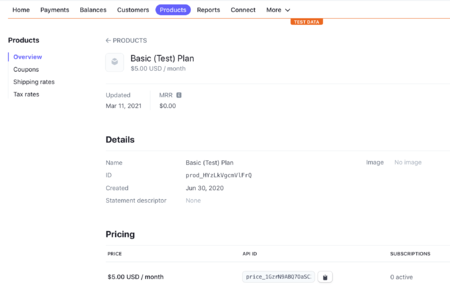
If you'd like to use Stripe to manage monthly or annual recurring payments or donations, you'll need to set up identical Products in both Stripe and HS with a fixed amount that you can offer to your customers/donors on your website.
In Stripe, each product will need a fixed price.
Once it's created in Stripe, create an identical Product in HS and enter the Stripe Price ID in the appropriate field for that product:
Important Note: Unfortunately Stripe does not offer dynamic recurring payments, where the amount is determined at checkout, so if this is a requirement of yours you'll need to find a different online credit card processor.
PayPal
If you have a PayPal business account, you can integrate your HS-enabled website to accept PayPal payments.
On your HS Company Settings record, enter the appropriate information in the PayPal section:
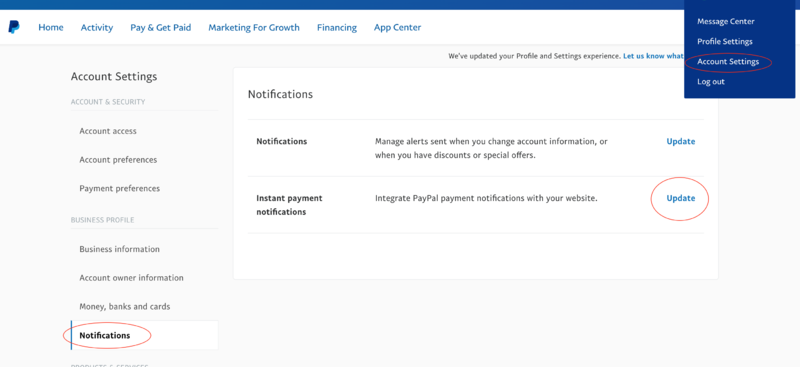
Next, login to your PayPal account, choose "Account Settings" from your pulldown menu (upper right), select "Notifications", and finally "Update" on the Instant Payment Notifications line.
You'll then be able to enter the endpoint for PayPal transaction posting to HS. Enter https://yourdomain.com/src/paypal_transaction.php
Be sure to enable Instant Payment Notifications, then PayPal will post all relevant completed transactions and subscription changes to your HS database.
Mailchimp
HS offers full back-and-forth integration with Mailchimp, meaning changes to your HS database will automatically update your Mailchimp database, and vice versa.
To do this you'll need to enter the following information into your HS Company Settings in the Mailchimp section:
Note: If your HS instance is not configured for Mailchimp, you won't see these fields in your HS Company Settings. Ask your HS consultant to activate them if necessary.
You'll also need to setup your Mailchimp webhook to notify HS of changes made from their end.
Mailchimp API Key
You can create or find this in your Mailchimp->Account page, under the "Extras" pulldown menu choice "API Keys". From this screen you create a new key or copy your existing key and enter it into your HS Company Settings, Mailchimp API Key field in the Mailchimp section.
Mailchimp Audience ID
Choose your Mailchimp Audience to sync with HS, then navigate to Settings->Audience name and defaults. There you'll find your Audience ID. Copy that to your HS Company Settings, Mailchimp Audience ID field in the Mailchimp section.
Mailchimp Webhook
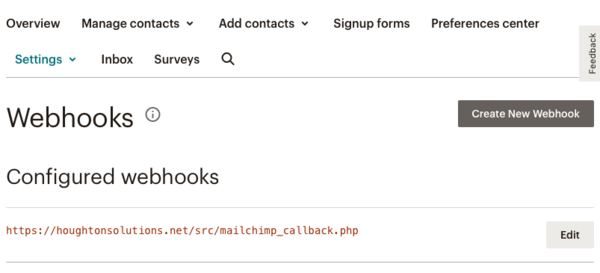
Choose your Mailchimp Audience to sync with HS, then navigate to Settings->Webhooks. Create one to point to https://yourdomain.com/src/mailchimp_callback.php
Mailchimp merge fields
Mailchimp allows you to define any number of custom database fields for your audience, called merge fields. Your HS consultant will help you set these up and configure your HS instance to keep these fields in sync with your HS data for those fields, so you can use them in Mailchimp to segment your audience and/or fill in your Campaign email templates.
Mailchimp Notifications Email
Use this field in HS to send Mailchimp signup error notifications, so they may be investigated if necessary.
